Integrated ID verification and AML checks
Overview
This guidance is provided to firms and partners who are interested in streamlining their onboarding processes by integrating AML related tasks, such as identity document collection and verification, biometric checks, AML checks and PEP/Sanctions screening. This guide will provide you with all the information you need to start using the Xama platform API for this purpose.
Xama stands out from our competitors in a number of ways:
- We charge no fee for the use of our API and provide you with free documentation and support to ensure your integration with the Xama platform has the best chance of success.
- You only pay for the checks and actions that you use. There is no need to sign a long term agreement or agree to a minimum number of checks. Our agreements come with no small print or negotiations on renewal.
- Our platform has been built with an API first approach. It means that our technology is simple to integrate using our extensive set of open APIs.
- We provide access to no-code tools such as our Make.com and Zapier applications which enables you to build rapid proof of concepts with no cost to you and without having to immediately commit to expensive development projects.
- Our platform provides access to industry leading identity verification providers for the verification of documents, AML checks and PEP/Sanctions screening and monitoring.
- Our platform provides access to functionality beyond ID verification. Best in class Companies House integrations, document management, client risk assessments, reporting and interactive dashboarding are all possibilities via our API.
Guidance in this document
The guidance in this document will demonstrate the ease in which you can:
- Create an authenticated connection to the Xama API in minutes.
- Use our ID collection and verification journeys via our API and embed this into your own client onboarding procedures.
- Use your own data, or data collected via the onboarding journey, to perform an AML check as well as PEP/Sanctions screening.
We also provide access to our full API documentation and an accompanying postman collection which means you will be able to get started with testing an integration within minutes.
Postman collection
To simplify following the guidance within this document, we provide a postman collection.
Postman is a tool with which you can easily carry out API calls. The postman collection we provide as part of this guide will allow you to import the API calls into postman as a collection. You will then be able to easily follow along and carry out the API calls without having to rewrite any of the API calls referenced in the guide.
Download the postman collection here.
You can use the free version of postman for the purposes of this guide.
In order to make use of the postman collection, you should:
- Download and install Postman (https://www.postman.com/downloads/)
- Import the postman collection which you have downloaded from the above link
This video demonstrates how you can import the postman collection and then:
- Replace oauth2 client ID and secret.
- Request an access token.
- Replace the access token and Xama client ID values with your own within the collection variables.
- Make an initial search call to your Xama account to ensure that the connection is established correctly.
Swagger documentation
This guide as well as the postman collection should be enough for you to navigate through all the steps without having to refer to our swagger documentation.
The Xama API is extensive and you will only need a few endpoints as part of following this guide. However, you will also have access to a host of other API endpoints which can be considered for further enhancement of any integration beyond the scope of what is covered within this guide.
Our swagger documentation is hosted here.
Getting started
In order to get started, you will need to create a free Xama account. You can do so from https://platform.xamatech.com. Please ensure that you provide verifiable contact details when creating a new Xama account. “Fake” accounts will be blocked and access removed.
If you already have a Xama account, you can either use your existing account or create a separate account for the purposes of testing the integration. We suggest that you use a production account when following this guide, however if you need to do extensive development and testing as part of your implementation please reach out to us for guidance and the possibility to access a sandbox account.
Authentication
In order to communicate with the Xama API, you will need to authenticate your service using OAuth2 credentials. Each API call needs to be accompanied with a valid access code which needs to be included within the Authorization header.
Your OAuth2 credentials
Each Xama account has been assigned OAuth2 credentials. You can find this when logged into your account:
Link to credentials: https://platform.xamatech.com/portal/hub/settings/apps/open-api
There are 3 keys:
- Xama Client ID: This unique ID is to identify your Xama account and you will need to use this ID within the URL of the API calls that are made to the Xama platform.
- OAuth2 client ID and Secret: This ID and Secret are used to request a valid access token.
Generating an access token
To request an access token you need to make the following call.
Postman Request reference: 01 Retrieve Access Token
With the following body:
| POST https://auth-proxy.xamatech.com/oauth/token body: { “client_id”: “oauth2_client_id”, “client_secret”: “oauth_2_client_secret”, “audience”: “https://api.xamatech.com”, “grant_type”: “client_credentials” } |
Ensure that you replace oauth2_client_id and oauth2_client_secret with your own credentials.
If you have been successful in requesting an access token you will receive a response such as the below:
| { “access_token”: “eyJhbGciOiJSUzI1NiI…………xyz”, “token_type”: “Bearer” } |
Note: Access tokens will expire periodically (15 minutes). When this happens you will need to request a new access token.
Making your first API call
In order to test your connection, you can make a search call to the Xama platform. If you have not yet added any data to the Xama account, the search response will be empty, but you should receive a response of 200, indicating successful communication with the Xama API.
Postman Request reference: 02 Search Clients
| GET https://xamahub.xamatech.com/api/clients/{{client_id}}/search?query=Jacques Headers: Authorization: Bearer access_token Response: { “items”: [ { “account_id”: “dbc744b0-0319-11ef-96f5-e7e56e13ef4e”, “account_name”: “Ajay Demo”, “account_status”: “ACTIVE”, “account_type”: “INDIVIDUAL”, “email”: “jacques@xamatech.com”, “entity”: “CONTACT”, “id”: “dbc744b1-0319-11ef-96f5-e7e56e13ef4e”, “name”: “Ajay Demo”, “status”: “ACTIVE”, “type”: “PRIMARY” } ] } |
- The host to use when communicating with the Xama API is https://xamahub.xamatech.com
- You will need to include the Xama Client ID within each call, replacing {{client_id}} with your unique Xama client ID.
A successful call will return a response of 200 and any results from the search.
ID collection and verification flow
The series of API calls covered within this guide will demonstrate the following flow:
- Creating a client and contact record within Xama
- Requesting the ID from the contact you have created
- Using webhooks to be notified when an onboarding request has been completed
- Retrieving the results of ID verification
- Update contact record
- Trigger an AML check and retrieve results

Create a Xama Client and Contact
In order to collect identity documents and run an AML check on an individual, they need to be created in Xama as a contact.
Their contact record will be attached to a client record. The client record can either be for an individual or for a company and a client record may have multiple contacts connected to it.
Two common examples of client / contact relationships are:
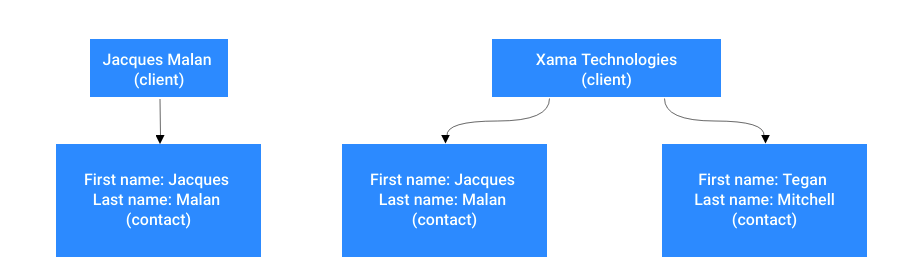
For the purpose of this guidance, we are going to use a client and contact who are an Individual entity.
Postman request reference: 03 Create Account Record
Note: Within the user interface of the Xama platform we refer to Clients (Individuals and Companies). In the API the terminology used is accounts.
| POST https://xamahub.xamatech.com/api/clients/{{client_id}}/accounts Headers: Authorization: Bearer access_token Body: { “name”: “Jacques Malan”, “type”: “INDIVIDUAL”, “reg_number”: “”, “metadata”: { “external_reference”: “JM001” }, “primary_contact”: { “first_name”: “Jacques”, “middle_name”: “”, “last_name”: “Malan”, “email”: “jacques@xamatech.com”, “phone”: “”, “date_of_birth”: “2001-03-11”, “driving_license_expiry_date”: “”, “driving_license_number”: “”, “passport_number”: “”, “passport_expiry_date”: “”, “primary_address”: { “street”: “26 Tommahawk Lane”, “postcode”: “SW20 8FR”, “city”: “Crewe”, “country_code”: “GB”, “type”: “PRIMARY” } } } |
Note that you are able to create a client record and the primary contact with one API call. If you already have details, such as their home address and date of birth these values can be set, however, this is optional and you may only receive this information as part of the onboarding request.
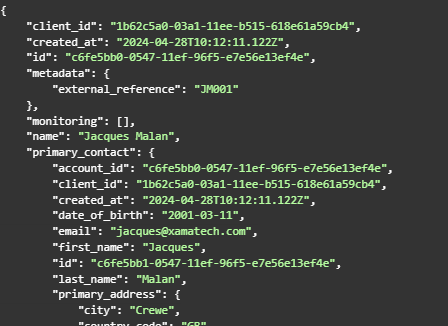
The response which you receive from the above call should be:
| Status: 201 { “client_id”: “1b62c5a0-03a1-11ee-b515-618e61a59cb4”, “created_at”: “2024-04-28T10:12:11.122Z”, “id”: “c6fe5bb0-0547-11ef-96f5-e7e56e13ef4e”, “metadata”: { “external_reference”: “JM001” }, “monitoring”: [], “name”: “Jacques Malan”, “primary_contact”: { “account_id”: “c6fe5bb0-0547-11ef-96f5-e7e56e13ef4e”, “client_id”: “1b62c5a0-03a1-11ee-b515-618e61a59cb4”, “created_at”: “2024-04-28T10:12:11.122Z”, “date_of_birth”: “2001-03-11”, “email”: “jacques@xamatech.com”, “first_name”: “Jacques”, “id”: “c6fe5bb1-0547-11ef-96f5-e7e56e13ef4e”, “last_name”: “Malan”, “primary_address”: { “city”: “Crewe”, “country_code”: “GB”, “created_at”: “2024-04-28T10:12:11.122Z”, “postcode”: “SW20 8FR”, “street”: “26 Tommahawk Lane”, “type”: “PRIMARY”, “updated_at”: “2024-04-28T10:12:11.122Z” }, “replica_mode”: “NORMAL”, “status”: “ACTIVE”, “type”: “PRIMARY”, “updated_at”: “2024-04-28T10:12:11.122Z” }, “status”: “ACTIVE”, “type”: “INDIVIDUAL”, “updated_at”: “2024-04-28T10:12:11.122Z” } |
You will also now see the client record if you visit the clients page within your Xama account.
Generating an Onboarding request
An onboarding request is the term used for the link which is sent to the end customer for uploading their home address, ID and optionally a selfie (biometric check) and proof of address document.
There are 2 options you can utilise when generating this request. The option you choose would depend on your requirements to embed the onboarding journey seamlessly into your own portal or onboarding journey or whether you would like the user to respond to an email specifically for the purpose of completing AML checks.
- Automated email and Xama thank you screen
If you choose this method, then you will trigger an email to your end customer.
The email will utilise the email template within your Xama account (you can modify the template here) and will be sent from your connected email account.
The end user will follow the link sent to them by email, complete the journey and the final screen will be a successful submission page hosted by Xama.
- Embed the onboarding link into your own journey
This end user journey is similar to what you might expect from a Stripe or GoCardless integration.
You can generate the onboarding request link, without generating an email, and host this link within your own environment. This might be a client portal or within a wizard that you want your user to complete.
As part of this option you can specify a callback URL. Instead of being shown a page by Xama following the successful upload of ID documents, the user is directed back to the environment in which you would like them to be. You can then utilise the results from the onboarding request, if needed, to direct the user to the next appropriate step of the customer onboarding process which you are in control of.
For the purposes of this guide, we will make use of option number 2.
Postman request reference: 06 Create onboarding request – client portal edition
| PUT https://xamahub.xamatech.com/api/clients/{{client_id}}/accounts/c6fe5bb0-0547-11ef-96f5-e7e56e13ef4e/contacts/c6fe5bb1-0547-11ef-96f5-e7e56e13ef4e/reports/onboarding Headers: Authorization: Bearer access_token Body: { “config”: { “ttl_in_days”: 365, “is_automatic_refresh_enabled”: false, “parameters”: { “proof_of_address”:true, “face_match”:false, “frontend_redirect_url”: “https://www.test.com/redirect”, “suppress_invitation_mail”: true } } } |
Note: The id’s used within the PUT request URL is from the response when we created the client/contact:
Within the body you can adjust the following parameters:
- proof_of_address: if set to true, the end user will be asked for a proof of address document as part of the request.
- face_match: if set to true, the end user will be asked to take a selfie which in turn will be used as part of biometric verification.
- frontend_redirect_url: If set, the user will be redirected to this URL once they have completed the onboarding request.
- suppress_invitation_mail: if set to true the Xama platform will not generate an email to the end user.
The generation of onboarding requests is an asynchronous process. This means that when you trigger the request, you do not get the details of the request back as part of the response. A successful request will only return a status of 204.
Retrieving an onboarding request
Postman request reference: 07 Retrieve onboarding request
An onboarding request will be available almost immediately after it was generated (unless there was an issue in creating it). We would suggest using our webhooks subscriptions (see webhook section for more details) as best practice to be notified when this is ready, but a small pause should also be sufficient.
| GET https://xamahub.xamatech.com/api/clients/{{client_id}}/accounts/c6fe5bb0-0547-11ef-96f5-e7e56e13ef4e/contacts/c6fe5bb1-0547-11ef-96f5-e7e56e13ef4e/reports/onboarding Headers: Authorization: Bearer access_token Response: { “account_id”: “c6fe5bb0-0547-11ef-96f5-e7e56e13ef4e”, “client_id”: “1b62c5a0-03a1-11ee-b515-618e61a59cb4”, “config”: { “parameters”: { “face_match”: “false”, “proof_of_address”: “true”, “frontend_redirect_url”: “https://www.test.com/redirect”, “suppress_invitation_mail”: “true” }, “ttl_in_days”: 365, “is_automatic_refresh_enabled”: false }, “contact_id”: “c6fe5bb1-0547-11ef-96f5-e7e56e13ef4e”, “data”: { “onboarding_url”: “https://idscan.xamatech.com/clients/1b62c5a0-03a1-11ee-b515-618e61a59cb4/reports/onboarding/c6fe5bb0-0547-11ef-96f5-e7e56e13ef4e–c6fe5bb1-0547-11ef-96f5-e7e56e13ef4e?key_id=c989f080-efba-11ee-95e7-ab639ad53d37&token=huKw69CEBhwBuK6cDwZDFmRoUHaYOmSrd5ASZ9x3F0jANZdpPZpPjpMLQQ%2BX47dKQplDxDhleG2n%2Bt47hGaGGqqkKjT2Rm00nL2ptdaDzuMApacyKBO2iZ3suOr%2FyHsC6%2FXG07knHJx0tnjrjJYJypI36e4PtOZIKM3Fon5KhmzPusU0uFOB3wLgx6%2BqOAmgbCsmgbkbDFQH0mB%2FdwYIqPysWwBx00KKOiI1NWJ4RBLmBYUWgQy2EFbPL4U2O9gHWGd8B3mMDrUMwbNEzX7IT3IlCxvelPnBVQ2dZcChTsVSDMKhohCFKkeXrZulOwouqS%2Bdrpy8RAVDxyn88CPbfQ%3D%3D”, “request_sent_at”: “2024-04-28T10:37:39.991Z” }, “id”: “c6fe5bb0-0547-11ef-96f5-e7e56e13ef4e–c6fe5bb1-0547-11ef-96f5-e7e56e13ef4e”, “review”: {}, “revision”: “1714300658059”, “status”: “INITIATED”, “type”: “ONBOARDING” } |
The URL which you can now use to present to the end user is demonstrated in the response as the onboarding_url value. If the user clicks on this link they will be directed to the onboarding journey hosted by Xama. Following the journey they will be directed back to the URL specified within the frontend_redirect_url.
Using webhooks
It is recommended to use webhook subscriptions when utilising Xama. This will prevent having to poll Xama for changes. A good example is not knowing when an end user have completed uploading their documents and those documents have been successfully processed.
Please note that the user may have been redirected to your environment following the successful upload of their documents, but the verification results on those documents may not have been completed. Subscribing to the webhook would ensure that you are notified when the verification process is completed.
Postman reference request: 08 Register webhooks subscription – onboarding request
| POST https://xamahub.xamatech.com/api/clients/{{client_id}}/subscriptions Headers: Authorization: Bearer access_token { “callback_url”: “https://hook.eu1.make.com/yclil6a7y2vv8ux768csguyabbcdbwt0”, “type”: “WEBHOOK”, “config”: { “api_secret”: “yoursecret”, “entities”: [ { “entity”: “CONTACT”, “report_types”: [ “ONBOARDING” ], “events”: [ “REPORT_INITIATED”, “REPORT_READY”, “REPORT_ERROR”, “REPORT_CREDIT_LIMIT_EXCEEDED”, “REPORT_IN_REVIEW”, “REPORT_REVIEW_COMPLETED” ] } ] } } |
Creating the following webhook subscription will ensure that you receive a notification to the callback_url specified when there is a change within an onboarding request.
You can choose which events you would like to be notified of by specifying the appropriate events within the events array. The REPORT_READY event will be triggered when a customer completes their onboarding request and the verification process is completed.
The message you will receive from Xama to your chosen endpoint will contain the following example payload:
| { “account_id”: “c6fe5bb0-0547-11ef-96f5-e7e56e13ef4e”, “client_id”: “1b62c5a0-03a1-11ee-b515-618e61a59cb4”, “contact_id”: “c6fe5bb1-0547-11ef-96f5-e7e56e13ef4e”, “entity”: “CONTACT”, “event”: “REPORT_READY”, “report_id”: “c6fe5bb0-0547-11ef-96f5-e7e56e13ef4e–c6fe5bb1-0547-11ef-96f5-e7e56e13ef4e”, “report_type”: “ONBOARDING”, “resource”: “https://xamahub.xamatech.com/api/clients/1b62c5a0-03a1-11ee-b515-618e61a59cb4/accounts/c6fe5bb0-0547-11ef-96f5-e7e56e13ef4e/contacts/c6fe5bb1-0547-11ef-96f5-e7e56e13ef4e/reports/onboarding” } |
Other instances of where webhooks can be used effectively:
- Onboarding request generated (REPORT_INITIATED)
- Credit balance exceeded when attempting to create a new onboarding request (REPORT_CREDIT_LIMIT_EXCEEDED)
- An AML check has been completed (Postman request reference: 08 Register webhooks subscription – aml check)
Webhooks can be used to track almost any actions within the Xama platform. Webhooks for client or contact records being updated, a change of risk assessment status and many more options ensures that you can track changes to Xama records and ensure records are updated within your application in real time.
Retrieving completed onboarding requests
Once you receive the webhook notification that an onboarding request has been completed you can retrieve the results using the value that was returned within the resource parameter passed as part of the notification.
| GET https://xamahub.xamatech.com/api/clients/1b62c5a0-03a1-11ee-b515-618e61a59cb4/accounts/c6fe5bb0-0547-11ef-96f5-e7e56e13ef4e/contacts/c6fe5bb1-0547-11ef-96f5-e7e56e13ef4e/reports/onboarding Headers: Authorization: Bearer access_token Response: { “account_id”: “c6fe5bb0-0547-11ef-96f5-e7e56e13ef4e”, “client_id”: “1b62c5a0-03a1-11ee-b515-618e61a59cb4”, “config”: { “parameters”: { “face_match”: “false”, “proof_of_address”: “true”, “frontend_redirect_url”: “https://www.test.com/redirect”, “suppress_invitation_mail”: “true” }, “ttl_in_days”: 365, “is_automatic_refresh_enabled”: false }, “contact_id”: “c6fe5bb1-0547-11ef-96f5-e7e56e13ef4e”, “data”: { “idscan”: { “date_of_birth”: “1985-01-17”, “document_type”: “Passport”, “passport_number”: “1071857032GBR8501178F1601312<<<<<<<<<<<<<<02”, “document_decision”: “EXPIRED”, “document_last_name”: “UNITED KINGDOM FIVE”, “document_expiry_date”: “2016-01-31”, “document_given_names”: “JODIE PIPPA”, “document_decision_date”: “2024-04-28T15:59:17.0768248”, “driving_license_number”: “107185703” }, “report_link”: “https://platform.xamatech.com/portal/clients/1b62c5a0-03a1-11ee-b515-618e61a59cb4/reports/onboarding/c6fe5bb0-0547-11ef-96f5-e7e56e13ef4e–c6fe5bb1-0547-11ef-96f5-e7e56e13ef4e/revisions/1714300658059”, “refreshed_at”: “2024-04-28”, “request_sent_at”: “2024-04-28T10:37:39.991Z”, “personal_details”: { “city”: “London”, “street”: “26 Fake Street”, “country”: “GB”, “postcode”: “LM34 5RU” } }, “id”: “c6fe5bb0-0547-11ef-96f5-e7e56e13ef4e–c6fe5bb1-0547-11ef-96f5-e7e56e13ef4e”, “review”: { “empty”: false, “status”: “IN_REVIEW”, “decision”: “EXPIRED” }, “revision”: “1714300658059”, “status”: “READY”, “type”: “ONBOARDING” } |
You can now use the data submitted as part of the onboarding request to update a contact and run an AML check. At this point the documents which have been submitted by the end customer are also accessible within the Xama account.
Update Xama contact record
Contact records within Xama are not automatically updated when an onboarding request is returned. This is to prevent overwriting any existing information without prior warning and also allows for you to review the results from the onboarding request before adding the information to the contact record.
You can update the contact using the following call.
Postman request reference: 09 Update a contact record
| PUT https://xamahub.xamatech.com/api/clients/{{client_id}}/accounts/c6fe5bb0-0547-11ef-96f5-e7e56e13ef4e/contacts/c6fe5bb1-0547-11ef-96f5-e7e56e13ef4e Headers: Authorization: Bearer access_token Body: { “first_name”: “Jacques”, “middle_name”: “”, “last_name”: “Malan”, “type”: “PRIMARY”, “email”: “jacques@xamatech.com”, “phone”: “”, “primary_address”: { “street”: “26 Fake Street”, “postcode”: “LM34 5RU”, “city”: “London”, “country_code”: “GB” }, “passport_number”: “1071857032GBR8501178F1601312<<<<<<<<<<<<<<02”, “passport_expiry_date”: “2016-01-31”, “date_of_birth”: “1985-01-17” } |
Following the above request, the contact record is updated with the information collected through the onboarding request.
The next step is to complete an AML check on the contact record.
Running an AML check
When you trigger an AML check to run, it will use the information that is recorded against the contact record. Ensure that contact records are updated with the latest accurate information. The minimum requirements for running an AML check is a first name, last name, postcode and country. However, we would advise that as much of the following information is populated to increase the chances of receiving positive match results:
- full home address,
- date of birth and
- document numbers and expiry dates
To run an AML check against a contact use the following.
Postman request reference: 10 Trigger AML report
| PUT https://xamahub.xamatech.com/api/clients/{{client_id}}/accounts/c6fe5bb0-0547-11ef-96f5-e7e56e13ef4e/contacts/c6fe5bb1-0547-11ef-96f5-e7e56e13ef4e/reports/aml Headers: Authorization: Bearer access_token |
No body element is required for triggering the AML check.
Once the AML check is triggered you can utilise webhooks to be notified when the AML check is complete. The AML check normally completes within seconds so it is also possible to have a short delay before retrieving the AML check or add polling to check whether an AML check has been completed.
Retrieving AML check results
Retrieve the results from an AML check using the following.
Postman reference request: 11 retrieve AML report
| GET https://xamahub.xamatech.com/api/clients/{{client_id}}/accounts/c6fe5bb0-0547-11ef-96f5-e7e56e13ef4e/contacts/c6fe5bb1-0547-11ef-96f5-e7e56e13ef4e/reports/aml Headers: Authorization: Bearer access_token Response: { “account_id”: “c6fe5bb0-0547-11ef-96f5-e7e56e13ef4e”, “client_id”: “1b62c5a0-03a1-11ee-b515-618e61a59cb4”, “config”: { “ttl_in_days”: 365, “is_automatic_refresh_enabled”: false }, “contact_id”: “c6fe5bb1-0547-11ef-96f5-e7e56e13ef4e”, “data”: { “decision”: “REFER”, “pep_matches”: “Potential Match”, “report_link”: “https://platform.xamatech.com/portal/clients/1b62c5a0-03a1-11ee-b515-618e61a59cb4/reports/aml/c6fe5bb0-0547-11ef-96f5-e7e56e13ef4e–c6fe5bb1-0547-11ef-96f5-e7e56e13ef4e/revisions/1714321998142”, “refreshed_at”: “2024-04-28”, “sanctions_matches”: “No Match”, “last_decision_date”: “2024-04-28” }, “id”: “c6fe5bb0-0547-11ef-96f5-e7e56e13ef4e–c6fe5bb1-0547-11ef-96f5-e7e56e13ef4e”, “review”: { “empty”: false, “status”: “IN_REVIEW”, “decision”: “REFER”, “pep_matches”: “POTENTIAL_MATCH”, “sanctions_matches”: “NO_MATCH” }, “revision”: “1714321998142”, “status”: “READY”, “type”: “AML” } |
There are three key results returned as part of the AML check within the data element:
- decision: This will be either PASS, REFER or ALERT. The decision is an indication whether the name, address, date of birth and passport/driving licence details could be verified against other data sources such as the electoral register or credit datasets.
- pep_matches: This will be either Potential Match or No Match
- sanctions_matches: This will be either Potential Match or No Match
The full report which lists the potential politically exposed people (if present) as well as the details behind the decision made is also available via the API but not covered within this document.
Conclusion
The Xama AML platform can be used for a number of different purposes but the collection of identity documents, verification of documents and performing AML checks is a common use case.
By utilising the API and our easy to integrate onboarding requests you can embed AML actions into your existing onboarding process.
You may also want to explore the following functionality further. Please speak to a member of our team to find out more about:
- Creating and tracking client risk assessments
- Utilising our companies house monitoring services (subscription applies)
- PEP and Sanctions monitoring services
- Document management and storage, including OCR technology to analyse and extract data from identity documents (subscription applies)
Our API provides flexible access to functionality to solve just about any AML related problem that you might come across.
Cost of using the Xama API
There is no initial setup or ongoing cost for utilising the Xama platform API.
You will incur costs when:
- An onboarding request is generated. Between 5 and 9 credits will be allocated to that request depending on whether you include biometric matching and the collection of a proof of address document.
- Credits are only consumed when the end user completes the onboarding request. An onboarding request can be cancelled at any time to free allocated credits.
- You will incur a cost of 4 credits when triggering an AML check
- Credits retail at £0.50 / credit excluding VAT.
Please speak to the Xama sales team about possible discounts on larger volumes of credit purchases as well as subscription options to utilise our companies house and document management services.
If you need any support when investigating or implementing our API, please reach out to us at xamaonboarding@xamatech.atlassian.net.